
Discover the basic structure of a website step by step applied in web designing. This article explains programming languages instead of folder wise formation.
Since this is my first tutorial here, before getting started, I want to introduce myself. My name is Mayaprakash Panth, aka Mahesh, aka Max Dai. I’ve been doing SEO and writing for CoderPradip’s Blog since September 2019. I will be your programming instructor in upcoming days. And by no means, this guide is not about me.
You must have a computer with a working internet connection to learn this tutorial.
Fine, Let’s get started.
[the_ad id=”2036″]
The basic structure of a website (Practice This)
Here we will cover the main components, skeleton, of a webpage. In this example, we will use the Wikipedia homepage.
How to check the source code
Follow these instructions:
- Open any browser like ‘Google Chrome‘.
- Type ‘www.wikipedia.org‘ without inverted commas in the URL box and press enter.
- Right-click on the blank white space after the page loads and select ‘Inspect‘. Or, you can press the hotkeys CTRL + SHIFT + I.
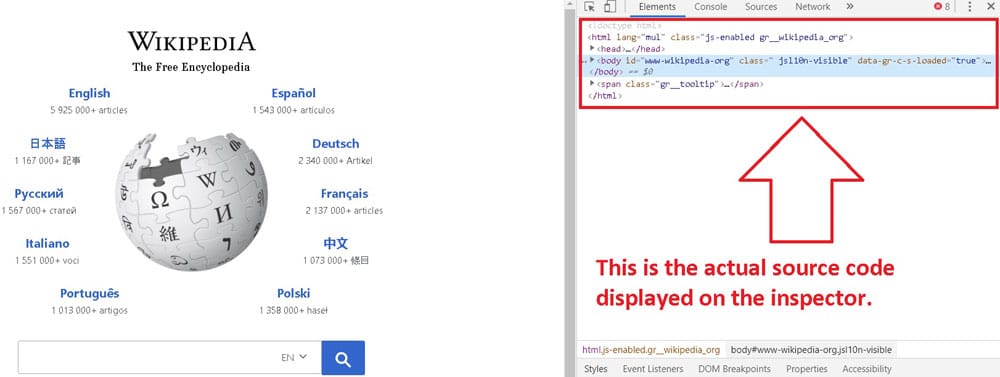
source code in the element inspector
The screen will split into two parts when you Inspect. On the left, it’s the Wikipedia Homepage. On the right, it’s the actual source code behind the web page. The chunk of codes might look scary now, but don’t worry. It’s super easy as I explain when we get into it. The corresponding section will highlight on the left if you put the mouse cursor over a code.
How does the source code work
Our browser sends a request to the server via the internet when we enter the website address. A server, also known as a web host, is a place where the website lives. It stores all the files of a site like codes, images, text, or any other.
The request sent by the browser must be accessible and become successful in the server. It will then send an HTML code which is known as source code. This forms the webpage and is available to check on the web-page inspector.
Our computer first downloads the source code. Then the browser, Google Chrome, interprets it and renders the page. This is how the source code works.
Reading the Source Code – Line by Line
To understand the structure of a website, we need to analyze its source code from start to finish. Some lines may be tough to understand, but we will ignore them for now. We will get the basic concept of how a website is built or made.
So in the case of Wikipedia, the DOCTYPE comes first. It tells the browser about the Document Type. For example, HTML, HTML5, or any other. Check this infographic to understand the structure of a website better:

There is an ‘HTML’ element below the DOCTYPE enclosed between the brackets <>. The command that we write between those two brackets is known as a ‘Tag’. Every tag must be closed using a forward slash ‘/’ to make it valid.
Check This:
- <html> – This identifies the start of the HTML tag using the brackets. These types of tags are also known as ‘Open Tags‘.
- </html> – It is now closed by putting a forward slash in front of the original tag. These are known as ‘Closed Tags‘.
As a rule of thumb, every open tag must be closed. Between them, you can add as many as tags you want as long as they are valid. If you see the above picture or look at the inspector, you will find that all of them are closed.
The <html> tag marks the start and end of our webpage. You can also add properties of a tag between the brackets. We can add nested elements between the tags.
The most important elements after <html> tag are:
- Head
- Body
[the_ad id=”2037″]
Reading the Head
If we expand the header on the inspector, we can discover more elements:
- <meta>: It is also known as the metadata tag. It provides extra information to the browser for parsing the page appropriately. These do not have a closing tag. Such tags are also known as self-closing tags.
- Character Set: This is written inside the meta tag. Example: <meta charset=”utf-8″>. UTF-8 is the commonly used character set in most of the web pages. It contains all the characters necessary to render a page.
- <Title>: This declares the title of the page that is displayed on the tabs for browser. If you bookmark a page, this title will be seen on its name. Example: <title>Coder Pradip</title>.
- Viewport: This meta tag is used for responsive web designing. It helps the browser to display a web page of proper size in different devices. Example: <meta name=”viewport” scalable=”yes”> This allows users to zoom in and out. Remember, there are millions of other meta tags which we will talk about in brief in the future.
- <link>: These tags are used to link a webpage to external webpages for various purposes.
- <style>: They are used with CSS files combined to decorate the page looks. CSS is a different part of the web designing that we will learn in the future.
Comments are the most commonly used HTML tags that can be written on any part. They are not visible on the web page to the users. They help the developers, or programmers to understand a certain line of code. This is how to write a comment: <!— This is a comment—>
The body tag displays everything that the page contains. It might consist of six different header tags, division class, image source, text, multimedia, and more.
[the_ad id=”2039″]
Final Words:
This was a small introduction to the structure of a website. We will go in-depth with more details about HTML tags in the future. Be sure to enable the notifications of our blog. Till then, this is Max Dai, signing off.